Note: How to use rsync without SSH

Server config: /etc/rsyncd.conf

uid = www-data
gid = www-data
max connections = 4
use chroot = no
log file = /var/log/rsyncd.log
pid file = /var/run/rsyncd.pid
lock file = /var/run/rsync.lock
#hosts allow = 0.0.0.0
#hosts deny = 192.168.100.0/24
 
[rsync]
path = /var/www/html
comment = rsync
auth users = rsync
ignore errors
read only = yes
list = yes
auth users = rsync
secrets file = /etc/rsyncd.pwd

Secret: /etc/rsyncd.pwd

rsync:rsync

Server run:

$ rsync --daemon --config=/etc/rsyncd.conf

Client connect:

$ rsync --list-only -rsh=rsh --port=873 rsync@YOUR_TARGET_ADDRESS::rsync

Note: How to reverse proxy a Minecraft server with Nginx

Check your kernel version >= 4.9

uname -a

Enable BBR

sysctl -w net.core.default_qdisc=fq
sysctl -w net.ipv4.tcp_congestion_control=bbr
sysctl -w net.ipv4.tcp_notsent_lowat=16384
sysctl -p

Add stream config to /etc/nginx/nginx.conf

stream {
include /etc/nginx/tcp.d/*.conf;
}

Create a new config for Minecraft server

upstream [YOUR_MINECRAFT_SERVER] {
server [YOUR_MINECRAFT_SERVER]:[PORT];
}
server {
listen [PORT];
proxy_pass [YOUR_MINECRAFT_SERVER];
 
}

Test Nginx config

nginx -t

Reload Nginx

nginx -s reload

Optional: Add DNS SRV record

Name     _minecraft._tcp.[YOUR_MINECRAFT_SERVER].tld
Priority [0-65535]
Weight   [0-65535]
Port     [PORT]
Value    [YOUR_MINECRAFT_SERVER]

How to boot BPI-M2U/M2B up from SATA device

BPI-M2 Ultra is a powerful Quad-Core ARMv7 based SBC (Single Board Computer) with a powerful Allwinner R40 SoC and 2 GiB DDR3 RAM. BPI-M2 Berry is a Raspberry Pi compatible version of M2U with V40 SoC, an automotive version of R40, and fewer RAM (1 GiB). They are software compatible.

For some reason we want to boot M2U from SATA device for better IO performance. The following photo shown how to connect a SATA HDD to M2U.

M2U_SATA

From design of Allwinner, the default boot devices sequence has been cured in the BOOT ROM of SoC. The priorities of boot devices from high to low are SD card > NAND > eMMC > NOR SPI Flash.

There is no SATA device right? NP, we can load and boot bootloader and U-Boot form a SD card. By setting the kernel cmdline in the uEnv of U-Boot, it will take over the right from SD card to the SATA device at the second boot stage.

So let’s start.

First prepare a bootable SD card from official released image, like this.

Then open the 256MiB FAT partition called BPI-BOOT.

Open and edit /bananapi/bpi-m2u/linux/720p/uEnv.txt. Attention: which file you need to edit depend on which bootloader you select with bpi-bootsel, the default bootloader will load the environment configuration from 720P.

Find this part of this file.

root=/dev/mmcblk0p2 rootfstype=ext4 rw rootwait bootmenutimeout=10 datadev=mmcblk0p2
console=earlyprintk=sunxi-uart,0x01c28000 console=tty1 console=ttyS0,115200n8 no_console_suspend consoleblank=0
bootopts=enforcing=1 initcall_debug=0 loglevel=4 init=/init cma=256M panic=10
volumioarg=imgpart=/dev/mmcblk0p2 imgfile=/volumio_current.sqsh rw rootwait

Change the three MMC block device to /dev/sda2, like that.

root=/dev/sda2 rootfstype=ext4 rw rootwait bootmenutimeout=10 datadev=sda2
console=earlyprintk=sunxi-uart,0x01c28000 console=tty1 console=ttyS0,115200n8 no_console_suspend consoleblank=0
bootopts=enforcing=1 initcall_debug=0 loglevel=4 init=/init cma=256M panic=10
volumioarg=imgpart=/dev/sda2 imgfile=/volumio_current.sqsh rw rootwait

Now we have a SD card to boot root file system on  the SATA device.

It’s easier to prepare the root filesystem on HDD. Just need to dd the original official released image to the HDD like a SD card. Then expand or resize the root fs like normal. Then power it up.

Now enjoy.

Installing k1om RPMs with zypper using an http repo for Intel Xeon Phi coprocessor

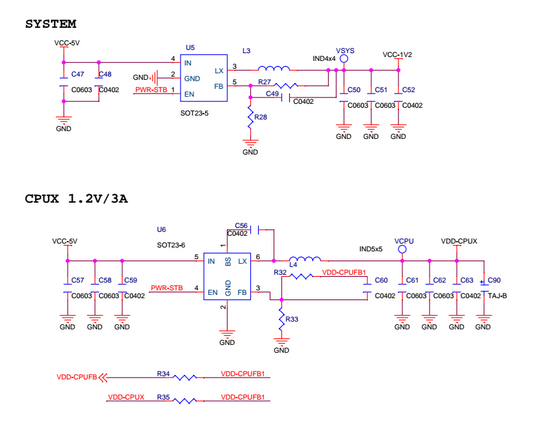
One obvious disadvantage of the previous method is that, where there are dependencies, the user must install RPMs in the correct order. This can be solved by creating a repo on the host that zypper can access from the coprocessor. Zypper is preinstalled in the coprocessor’s default file system.

The steps in this section are for creating a repository of RPMs and using the Python SimpleHTTPServer for serving them; we assume that these tools have been previously installed on the host. Though other repository creation tools and HTTP servers are available, we only provide instructions for using createrepo and Python SimpleHTTPServer. The host firewall or iptables may need to be configured to allow zypper to access the repository on the host.

Change to the folder where the k1om RPMs were extracted:


[host]$ cd $MPSS38_K1OM

Use the createrepo tool to create a new repo:


[host]$ createrepo .

Start an http server as follows:


[host]# python -m SimpleHTTPServer ${PORT_NUMBER}

From another terminal, add the repo on a coprocessor:


[host]$ ssh root@micN -R ${SOME_PORT}:host:${PORT_NUMBER}
[micN]# zypper addrepo http://host:${PORT_NUMBER} mpss

If no port is specified, python -m SimpleHTTPServer defaults to port 8000. In that case, the following is sufficient:


[host]$ ssh root@micN
[micN]# zypper addrepo http://host:8000 mpss

Now install RPMs as needed:

[micN]# zypper install <rpm file>

For example, to install man:


[micN]# zypper install man
File 'repomd.xml' from repository 'mpss' is unsigned, continue? [yes/no] (no): yes
Building repository 'mpss' cache [done]
Loading repository data...
Reading installed packages...
Resolving package dependencies...
The following NEW packages are going to be installed:
groff less libperl5 man perl
5 new packages to install.
Overall download size: 2.8 MiB. After the operation, additional 8.4 MiB will be used. 
Continue? [y/n/?] (y): y
Retrieving package libperl5-5.14.2-r7.k1om (1/5), 709.0 KiB (1.5 MiB unpacked)
Retrieving: libperl5-5.14.2-r7.k1om.rpm [done]
Retrieving package less-444-r2.k1om (2/5), 78.0 KiB (163.0 KiB unpacked)
Retrieving: less-444-r2.k1om.rpm [done]
Retrieving package perl-5.14.2-r7.k1om (3/5), 16.0 KiB (36.0 KiB unpacked)
Retrieving: perl-5.14.2-r7.k1om.rpm [done]
Retrieving package groff-1.20.1-r1.k1om (4/5), 1.9 MiB (6.4 MiB unpacked)
Retrieving: groff-1.20.1-r1.k1om.rpm [done]
Retrieving package man-1.6f-r2.k1om (5/5), 130.0 KiB (266.0 KiB unpacked)
Retrieving: man-1.6f-r2.k1om.rpm [done]
Installing: libperl5-5.14.2-r7 [done]
Installing: less-444-r2 [done]
Additional rpm output:
update-alternatives: Linking //usr/bin/less to less.less
Installing: perl-5.14.2-r7 [done]
Installing: groff-1.20.1-r1 [done]
Installing: man-1.6f-r2 [done]

We see that zypper takes care of all the dependencies if they can be satisfied by the RPM files in the repo.
The directory containing such a repository can also be NFS mounted. Zypper can then access it as in a local directory.

继续阅读Installing k1om RPMs with zypper using an http repo for Intel Xeon Phi coprocessor

How to adjust the CPU voltage of BPI-M2+

This article introduced how to adjust the VCC-CPUX voltage of the BPI-M2+ with replacing a register of power circuit.

———————————

WARNING!

With any hardware change or component soldering.

You will LOST all warranty of your Banana Pi!

———————————

When I did something system image build and test tasks for the BPI-M2+ with Allwinner H3 before it on stock last year, I have received a Engineer Sample (ES) form SINOVOIP, the manufacturer of Banana Pi.

The Banana Pi Community Forum have received a lot of reports of the too high VCC-CPUX voltage causing horrible heat issue from other developers.

There is a easy to measure the VCC-CPUX voltage of your BPI-M2+.

This picture shows the Test Point (TP: VCPU) of VCC-CPUX.

QQ图片20170426093111

If you get a result like me, Congratulation! You got a ES. (R. I. P. the warranty


Okay, the next step is replace the reference register in the feedback circuit of the voltage regulator.

QQ图片20170426093445

QQ图片20170426093459

I have no 0402 register in my component library, so I use the 0805. (I’m sorry for that.

Before:QQ图片20170426093427

After:QQ图片20170426093436


And it works. 🙂

QQ图片20170426094321


According to the AW’s whitepaper H3 should work at 1.008GHz max_freq, but I tested ok with the 1.2GHz sys_config. Lucky~

photo_2017-04-25_21-52-13

This is the cpuinfo_cur_freq result of running cpuburn-a7 (https://github.com/ssvb/cpuburn-arm/raw/master/cpuburn-a7.S) and corekeeper.sh.

The idle CPU temperature is about 15 degrees Celsius lower than work at 1.4 V.

继续阅读How to adjust the CPU voltage of BPI-M2+

使用Nginx为网站设置反向代理

前几天遇到一个比较难搞的CDN,想了半天还是做了反代。

1、 首先安装Nginx(随便怎么装都行)


sudo apt-get install nginx

2、 在/etc/nginx/nginx.conf中的http{}部分include一个vhost的conf,例如


http {

sendfile on;
tcp_nopush on;
tcp_nodelay on;
keepalive_timeout 65;
types_hash_max_size 2048;

include /etc/nginx/mime.types;
default_type application/octet-stream;

access_log /var/log/nginx/access.log;
error_log /var/log/nginx/error.log;

gzip on;
gzip_disable "msie6";

include /etc/nginx/conf.d/*.conf;
include /etc/nginx/sites-enabled/*;
include /etc/nginx/yoursite.conf;    #在最后添加一行

}

3、 vhosts.conf的内容可以这样写


## Basic reverse proxy server ##
## backend for yoursite ##
upstream apachephp {
server 1.2.3.4; #源站IP
}

## Start yoursite ##
server {
listen 80; #监听端口
server_name yoursite.com; #绑定域名

root html;
index index.php;

## send request back to source ##
location / {
proxy_pass http://yoursite.com; #回源域名 稍后会讲一个小技巧

#Proxy Settings 按照实际需求修改以下参数
proxy_redirect off;
proxy_set_header Host $host;
proxy_set_header X-Real-IP $remote_addr;
proxy_set_header X-Forwarded-For $proxy_add_x_forwarded_for;
proxy_next_upstream error timeout invalid_header http_500 http_502 http_503 http_504;
proxy_max_temp_file_size 0;
proxy_connect_timeout 90;
proxy_send_timeout 90;
proxy_read_timeout 90;
proxy_buffer_size 4k;
proxy_buffers 4 32k;
proxy_busy_buffers_size 64k;
proxy_temp_file_write_size 64k;
}
}
## End yoursite ##

4、 重载Nginx


nginx -s reload

继续阅读使用Nginx为网站设置反向代理

Linux命令之查看文件占用空间大小-du,df

du(disk usage),顾名思义,查看目录/文件占用空间大小

#查看当前目录下的所有目录以及子目录的大小
$ du -h

$ du -ah

#-h:用K、M、G的人性化形式显示

#-a:显示目录和文件

du -h tmp

du -ah tmp
#只查看当前目录下的tmp目录(包含子目录)的大小

#查看当前目录及其指定深度目录的大小
du -h –-max-depth=0
#-–max-depth=n:只深入到第n层目录,此处设置为0,即表示不深入到子目录

du命令的一些常用参数:
-a或-all 显示目录中个别文件的大小
-b或-bytes 显示目录或文件大小时,以byte为单位
-c或–total 除了显示个别目录或文件的大小外,同时也显示所有目录或文件的总和
-D或–dereference-args 显示指定符号连接的源文件大小
-h或–human-readable 以K,M,G为单位,提高信息的可读性
-k或–kilobytes 以1024 bytes为单位
-l或–count-links 重复计算硬件连接的文件
-L或–dereference 显示选项中所指定符号连接的源文件大小
-m或–megabytes 以1MB为单位
-s或–summarize 仅显示总计
-S或–separate-dirs 显示个别目录的大小时,并不含其子目录的大小
-X<文件>或–exclude-from=<文件>
–exclude=<目录或文件> 略过指定的目录或文件

–max-depth=<目录层数> 超过指定层数的目录后,予以忽略

df 用于查看设备的空间使用率

$ df -lh

#查看设备使用率

继续阅读Linux命令之查看文件占用空间大小-du,df

如何关闭MySQL日志并删除mysql-bin.0000*日志文件

LNMP一键安装包安装的MySQL默认是开启了日志文件的,如果数据操作比较频繁就会产生大量的日志,在/usr/local/mysql/var/下面产生mysql-bin.0000* 类似的文件,而且一般都在几十MB到几个GB,更甚会吃掉整个硬盘空间,从来导致mysql无法启动或报错。

如何关闭MySQL的日志功能:

删除日志:

执行:/usr/local/mysql/bin/mysql -u root -p

输入密码登录后再执行:reset master;

回车后再输入:quit 退出mysql命令模式。

彻底禁用MySQL日志:修改/etc/my.cnf 文件,找到

log-bin=mysql-bin
binlog_format=mixed

再这两行前面加上#,将其注释掉,再执行/etc/init.d/mysql restart即可。

如果实在想保留日志,可以在/etc/my.cnf里[mysqld]部分中加入expire_logs_days = 10 然后重启mysql,这样10天就会自动清理日志。

本文以LNMP一件安装包安装的环境为例除MySQL重启命令和配置文件路径可能略有不同,其他一样。

如果VPS或服务器上一点空间都没有启动不了的话可以mysql-bin.0000*删除,然后清空mysql-bin.index文件里的内容,再重启mysql,这样虽然也可以清理日志,但是有一定的分析,如采用此方法建议先备份日志及数据库文件。

———————————-
引用:
http://www.vpser.net/manage/delete-mysql-mysql-bin-0000-logs.html

关于MCN无法使用路由器进行MAC鉴权的临时解决办法

症状: 网开好了,电脑直接插网线可以上网,但是用路由器不能上网。

同学可以参考以下方法:

1、打开路由器管理配置界面(通常默认是 http://192.168.1.1 )
2、打开 WAN口设置(或 上网设置)
3、连接方式选择 DHCP(或 自动获取IP)
4、MAC地址克隆 选择 本机MAC(或 本管理PC的MAC)
5、保存设置
6、更新IP(或 重启路由器)

QQ图片20160522111035

不同路由器配置方法不尽相同,仅供参考

顺便随手附上查询已用流量的链接:
https://web.mcn.hs-mittweida.de/index.php/de/meinmcn/traffic

解决ubuntu和windows双系统时间差异8小时的方法

Windows/Ubuntu 双系统用户会发现在 Ubuntu 里面的时间正常的情况下Windows的系统时间被改到8小时前。

原来 Linux 操作系统是以 CMOS 时间做为格林威治标准时间,再根据系统设置的时区来确定目前系统时间。但是Windows 会直接修改CMOS 时间。而中国的时区是+8区,所以才会造成时间被调整了-8个小时。

所以您可以让 Windows 去使用时区或者让 Ubuntu 使用本地时间。

修改 Windows 使用时区的方法是在注册表:

HKEY_LOCAL_MACHINE\SYSTEM\CurrentControlSet\Control\TimeZoneInformation\

下面增加一个名为 RealTimeIsUniversal 的REG_DWORD 键,并赋值为 1。

而让Ubuntu 使用本地时间的方法是:

sudo gedit /etc/default/rcS

把里面的 UTC=yes 改为 UTC=no

———————————-
引用:
http://blog.chinaunix.net/uid-8305736-id-2033022.html