Build a customized iPXE firmware and deploy a chain loading environment

As the number of devices in my network has increased, so has the workload of performing maintenance on these systems. From time to time I need to use some rescue systems, such as WinPE and Linux LiveCD. Mounting boot images for them often requires the use of a corresponding management tool or out-of-band management, such as IPMI or BMC manager. The physical machine even needs to burn a USB boot disk.

Preboot eXecution Environment, the abbreviation is PXE, provides a mechanism for booting a computer using the NIC. This mechanism allows the computer to boot without relying on a local data storage device (such as a hard disk) or a locally installed operating system.

So I noticed that there is an open-source PXE firmware called iPXE. Building a customized iPXE firmware is simple according to the wiki page of iPXE.

sudo apt update
sudo apt install git gcc binutils make perl liblzma-dev mtools
git clone git://git.ipxe.org/ipxe.git
cd ipxe/src
make

I need the chain loading function, so I need to add some parameters during the building process like this.

make bin/nm-undionly-20211002-1a.kpxe EMBED=nmboot.ipxe
make bin-x86_64-efi/nm-ipxe-20211002-1a.efi EMBED=nmboot.ipxe

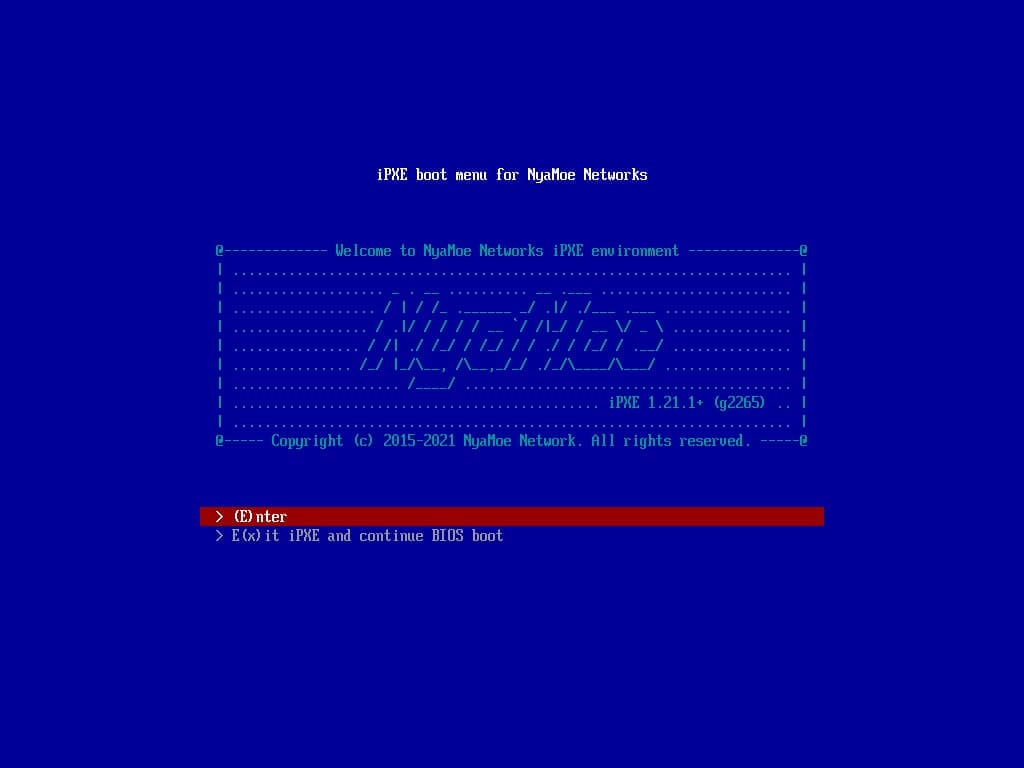
Now I get both legacy BIOS and UEFI PXE firmware embedded my own chain loading script nmboot.ipxe. The script is quiet simple, just chaining the entry point from my HTTP server.

#!ipxe
   
dhcp
chain http://172.16.0.11/pxe/ipxe/boot.php

The advantage of this is that it minimizes the size of iPXE firmware for the NIC PXE to be downloaded from the TFTP Server, i.e., the Next Server that has been given by DHCP server. Because of the slow loading speed over TFTP.

My home lab use pfSense as my gateway and DHCP server, the DHCP server config is quite simple.

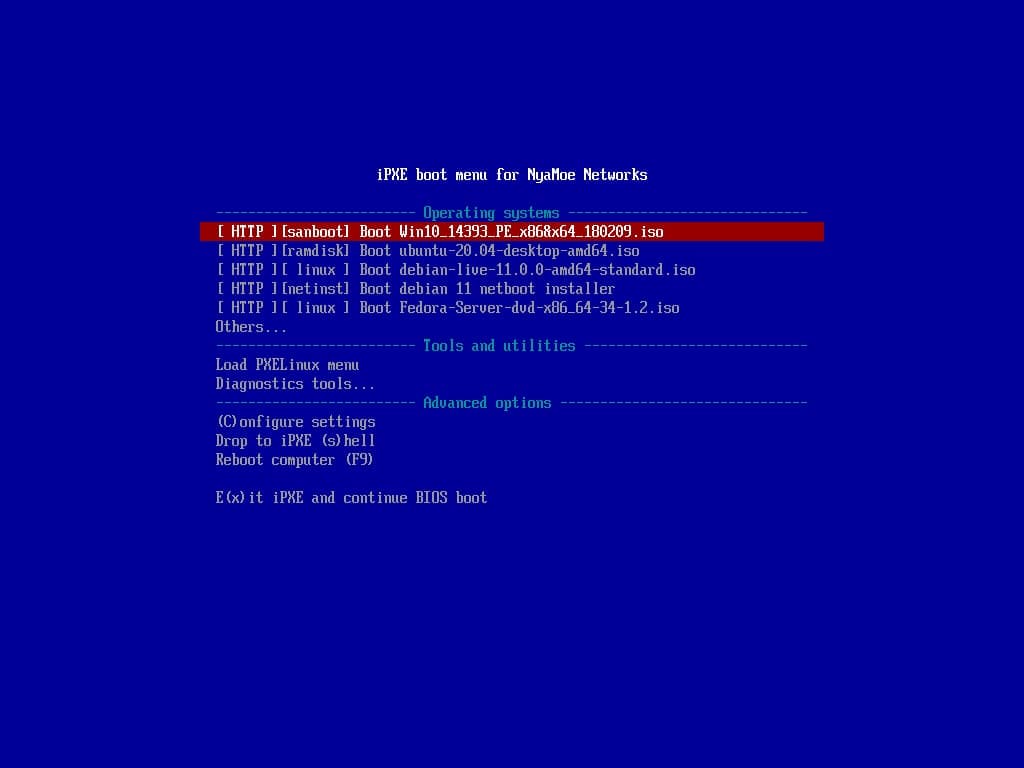
The next step is just to prepare the file on the http server. Refer here.

It’s done!

阅读更多:Build a customized iPXE firmware and deploy a chain loading environment

Reference:

https://ipxe.org/

https://gist.github.com/robinsmidsrod/2234639

https://fogproject.org/

How to boot BPI-M2U/M2B up from SATA device

BPI-M2 Ultra is a powerful Quad-Core ARMv7 based SBC (Single Board Computer) with a powerful Allwinner R40 SoC and 2 GiB DDR3 RAM. BPI-M2 Berry is a Raspberry Pi compatible version of M2U with V40 SoC, an automotive version of R40, and fewer RAM (1 GiB). They are software compatible.

For some reason we want to boot M2U from SATA device for better IO performance. The following photo shown how to connect a SATA HDD to M2U.

M2U_SATA

From design of Allwinner, the default boot devices sequence has been cured in the BOOT ROM of SoC. The priorities of boot devices from high to low are SD card > NAND > eMMC > NOR SPI Flash.

There is no SATA device right? NP, we can load and boot bootloader and U-Boot form a SD card. By setting the kernel cmdline in the uEnv of U-Boot, it will take over the right from SD card to the SATA device at the second boot stage.

So let’s start.

First prepare a bootable SD card from official released image, like this.

Then open the 256MiB FAT partition called BPI-BOOT.

Open and edit /bananapi/bpi-m2u/linux/720p/uEnv.txt. Attention: which file you need to edit depend on which bootloader you select with bpi-bootsel, the default bootloader will load the environment configuration from 720P.

Find this part of this file.

root=/dev/mmcblk0p2 rootfstype=ext4 rw rootwait bootmenutimeout=10 datadev=mmcblk0p2
console=earlyprintk=sunxi-uart,0x01c28000 console=tty1 console=ttyS0,115200n8 no_console_suspend consoleblank=0
bootopts=enforcing=1 initcall_debug=0 loglevel=4 init=/init cma=256M panic=10
volumioarg=imgpart=/dev/mmcblk0p2 imgfile=/volumio_current.sqsh rw rootwait

Change the three MMC block device to /dev/sda2, like that.

root=/dev/sda2 rootfstype=ext4 rw rootwait bootmenutimeout=10 datadev=sda2
console=earlyprintk=sunxi-uart,0x01c28000 console=tty1 console=ttyS0,115200n8 no_console_suspend consoleblank=0
bootopts=enforcing=1 initcall_debug=0 loglevel=4 init=/init cma=256M panic=10
volumioarg=imgpart=/dev/sda2 imgfile=/volumio_current.sqsh rw rootwait

Now we have a SD card to boot root file system on  the SATA device.

It’s easier to prepare the root filesystem on HDD. Just need to dd the original official released image to the HDD like a SD card. Then expand or resize the root fs like normal. Then power it up.

Now enjoy.

双系统下grub的相关设置

我的电脑是装了两个系统,一个是 win8.1,另一个是 ubuntu 14.04。默认情况下,每次开机时,电脑会显示grub菜单等待30秒,默认是选中ubuntu的,这个太浪费时间了。

查了一下资料,原来通过设置可以将grub设置为每次默认选中上次进入的系统,而且还可以设定等待时间。

  1. 首先在终端输入命令:sudo gedit /etc/default/grub
  2. 然后修改其内如下,我在下面贴出了文件中的前面几行,后面的都没动,其实后面也都是注释而已。
  3. 最后还要运行 sudo update-grub 命令,提交本次修改的设置。

/etc/default/grub

# If you change this file, run 'update-grub' afterwards to update
# /boot/grub/grub.cfg.
# For full documentation of the options in this file, see:
# info -f grub -n 'Simple configuration'

GRUB_DEFAULT=saved  # 每次默认的系统是上次进入的系统
GRUB_SAVEDEFAULT=true # 上面设置了 saved 值,就要写上这句
#GRUB_HIDDEN_TIMEOUT=0
GRUB_HIDDEN_TIMEOUT_QUIET=true
GRUB_TIMEOUT=3 # 默认等待的时间设为 3 秒,可以根据自己的习惯调整
GRUB_DISTRIBUTOR=`lsb_release -i -s 2> /dev/null || echo Debian`
GRUB_CMDLINE_LINUX_DEFAULT="quiet splash"
GRUB_CMDLINE_LINUX=""


偶然发现这个文件ubuntu-logo.grub,可以直接修改grub背景颜色

修改Grub背景颜色

sudo gedit /lib/plymouth/themes/ubuntu-logo/ubuntu-logo.grub
#原来的紫色
#if background_color 44,0,30; then
#  clear
#fi#改成黑色
if background_color 0,0,0; then
clear
fi
#链接关系:
#/etc/alternatives/default.plymouth.grub /lib/plymouth/themes/ubuntu-logo/ubuntu-logo.grub
#/lib/plymouth/themes/default.grub /etc/alternatives/default.plymouth.grub

———————-

参考资料:

http://blog.csdn.net/zhang_hui_cs/article/details/8570253

http://www.xuebuyuan.com/1945828.html