socat tcp-listen:[LISTENING PORT],fork,reuseaddr tcp-connect:[TARGET ADDRESS]:[TARGET PORT]
作者: OtakuNekoP
Note: Setup collectd and collectd-web on Ubuntu/Debian
# apt install collectd

# nano /etc/collectd/collectd.conf

# service collectd start

# apt-get install git
# apt-get install python
# apt-get install librrds-perl libjson-perl libhtml-parser-perl libcgi-session-perl

# cd ~
# git clone https://github.com/httpdss/collectd-web.git
# cd collectd-web
# chmod +x cgi-bin/graphdefs.cgi

# nano runserver.py

Change listen IP address to 0.0.0.0

# ./runserver.py &

# killall python
Note: Add swap file to ubuntu
Check swap file
# swapon -s
Create swap file
# dd if=/dev/zero of=/swap.img bs=1G count=8
Set swap file right
chmod 600 /swap.img
Check swap file right
# ll /swap.img
Format swap file
# mkswap /swap.img
Activate swap file
# swapon /swap.img
Deactivate swap file
# swapoff /swap.img
Check swap
# swapon -s
# free -h
Auto mount swap fs
# echo "/swap.img none swap sw 0 0" >> /etc/fstab
Note: How to use rsync without SSH
Server config: /etc/rsyncd.conf
uid = www-data
gid = www-data
max connections = 4
use chroot = no
log file = /var/log/rsyncd.log
pid file = /var/run/rsyncd.pid
lock file = /var/run/rsync.lock
#hosts allow = 0.0.0.0
#hosts deny = 192.168.100.0/24

[rsync]
path = /var/www/html
comment = rsync
auth users = rsync
ignore errors
read only = yes
list = yes
auth users = rsync
secrets file = /etc/rsyncd.pwd
Secret: /etc/rsyncd.pwd
rsync:rsync
Server run:
$ rsync --daemon --config=/etc/rsyncd.conf
Client connect:
$ rsync --list-only -rsh=rsh --port=873 rsync@YOUR_TARGET_ADDRESS::rsync
Note: Environment for congenial-octo-system
This is quick note for configuring congenial-octo-system created by imi415.
System:
ubuntu-18.04.3-live-server-amd64
Command:
apt install ruby-dev gcc make nodejs zlib1g-dev libsqlite3-dev redis-server
bundle install
bin/rails db:migrate RAILS_ENV=development
rails s
Result:
Note: How to reverse proxy a Minecraft server with Nginx
Check your kernel version >= 4.9
uname -a
Enable BBR
sysctl -w net.core.default_qdisc=fq
sysctl -w net.ipv4.tcp_congestion_control=bbr
sysctl -w net.ipv4.tcp_notsent_lowat=16384
sysctl -p
Add stream config to /etc/nginx/nginx.conf
stream {
include /etc/nginx/tcp.d/*.conf;
}
Create a new config for Minecraft server
upstream [YOUR_MINECRAFT_SERVER] {
server [YOUR_MINECRAFT_SERVER]:[PORT];
}
server {
listen [PORT];
proxy_pass [YOUR_MINECRAFT_SERVER];

}
Test Nginx config
nginx -t
Reload Nginx
nginx -s reload
Optional: Add DNS SRV record
Name     _minecraft._tcp.[YOUR_MINECRAFT_SERVER].tld
Priority [0-65535]
Weight   [0-65535]
Port     [PORT]
Value    [YOUR_MINECRAFT_SERVER]
How to boot BPI-M2U/M2B up from SATA device
BPI-M2 Ultra is a powerful Quad-Core ARMv7 based SBC (Single Board Computer) with a powerful Allwinner R40 SoC and 2 GiB DDR3 RAM. BPI-M2 Berry is a Raspberry Pi compatible version of M2U with V40 SoC, an automotive version of R40, and fewer RAM (1 GiB). They are software compatible.
For some reason we want to boot M2U from SATA device for better IO performance. The following photo shown how to connect a SATA HDD to M2U.

From design of Allwinner, the default boot devices sequence has been cured in the BOOT ROM of SoC. The priorities of boot devices from high to low are SD card > NAND > eMMC > NOR SPI Flash.
There is no SATA device right? NP, we can load and boot bootloader and U-Boot form a SD card. By setting the kernel cmdline in the uEnv of U-Boot, it will take over the right from SD card to the SATA device at the second boot stage.
So let’s start.
First prepare a bootable SD card from official released image, like this.
Then open the 256MiB FAT partition called BPI-BOOT.
Open and edit /bananapi/bpi-m2u/linux/720p/uEnv.txt. Attention: which file you need to edit depend on which bootloader you select with bpi-bootsel, the default bootloader will load the environment configuration from 720P.
Find this part of this file.
root=/dev/mmcblk0p2 rootfstype=ext4 rw rootwait bootmenutimeout=10 datadev=mmcblk0p2
console=earlyprintk=sunxi-uart,0x01c28000 console=tty1 console=ttyS0,115200n8 no_console_suspend consoleblank=0
bootopts=enforcing=1 initcall_debug=0 loglevel=4 init=/init cma=256M panic=10
volumioarg=imgpart=/dev/mmcblk0p2 imgfile=/volumio_current.sqsh rw rootwait
Change the three MMC block device to /dev/sda2, like that.
root=/dev/sda2 rootfstype=ext4 rw rootwait bootmenutimeout=10 datadev=sda2
console=earlyprintk=sunxi-uart,0x01c28000 console=tty1 console=ttyS0,115200n8 no_console_suspend consoleblank=0
bootopts=enforcing=1 initcall_debug=0 loglevel=4 init=/init cma=256M panic=10
volumioarg=imgpart=/dev/sda2 imgfile=/volumio_current.sqsh rw rootwait
Now we have a SD card to boot root file system on the SATA device.
It’s easier to prepare the root filesystem on HDD. Just need to dd the original official released image to the HDD like a SD card. Then expand or resize the root fs like normal. Then power it up.
Now enjoy.
Installing k1om RPMs with zypper using an http repo for Intel Xeon Phi coprocessor
One obvious disadvantage of the previous method is that, where there are dependencies, the user must install RPMs in the correct order. This can be solved by creating a repo on the host that zypper can access from the coprocessor. Zypper is preinstalled in the coprocessor’s default file system.
The steps in this section are for creating a repository of RPMs and using the Python SimpleHTTPServer for serving them; we assume that these tools have been previously installed on the host. Though other repository creation tools and HTTP servers are available, we only provide instructions for using createrepo and Python SimpleHTTPServer. The host firewall or iptables may need to be configured to allow zypper to access the repository on the host.
Change to the folder where the k1om RPMs were extracted:
[host]$ cd $MPSS38_K1OM
Use the createrepo tool to create a new repo:
[host]$ createrepo .
Start an http server as follows:
[host]# python -m SimpleHTTPServer ${PORT_NUMBER}
From another terminal, add the repo on a coprocessor:
[host]$ ssh root@micN -R ${SOME_PORT}:host:${PORT_NUMBER}
[micN]# zypper addrepo http://host:${PORT_NUMBER} mpss
If no port is specified, python -m SimpleHTTPServer defaults to port 8000. In that case, the following is sufficient:
[host]$ ssh root@micN
[micN]# zypper addrepo http://host:8000 mpss
Now install RPMs as needed:
[micN]# zypper install <rpm file>
For example, to install man:
[micN]# zypper install man
File 'repomd.xml' from repository 'mpss' is unsigned, continue? [yes/no] (no): yes
Building repository 'mpss' cache [done]
Loading repository data...
Reading installed packages...
Resolving package dependencies...
The following NEW packages are going to be installed:
groff less libperl5 man perl
5 new packages to install.
Overall download size: 2.8 MiB. After the operation, additional 8.4 MiB will be used.
Continue? [y/n/?] (y): y
Retrieving package libperl5-5.14.2-r7.k1om (1/5), 709.0 KiB (1.5 MiB unpacked)
Retrieving: libperl5-5.14.2-r7.k1om.rpm [done]
Retrieving package less-444-r2.k1om (2/5), 78.0 KiB (163.0 KiB unpacked)
Retrieving: less-444-r2.k1om.rpm [done]
Retrieving package perl-5.14.2-r7.k1om (3/5), 16.0 KiB (36.0 KiB unpacked)
Retrieving: perl-5.14.2-r7.k1om.rpm [done]
Retrieving package groff-1.20.1-r1.k1om (4/5), 1.9 MiB (6.4 MiB unpacked)
Retrieving: groff-1.20.1-r1.k1om.rpm [done]
Retrieving package man-1.6f-r2.k1om (5/5), 130.0 KiB (266.0 KiB unpacked)
Retrieving: man-1.6f-r2.k1om.rpm [done]
Installing: libperl5-5.14.2-r7 [done]
Installing: less-444-r2 [done]
Additional rpm output:
update-alternatives: Linking //usr/bin/less to less.less
Installing: perl-5.14.2-r7 [done]
Installing: groff-1.20.1-r1 [done]
Installing: man-1.6f-r2 [done]
We see that zypper takes care of all the dependencies if they can be satisfied by the RPM files in the repo.
The directory containing such a repository can also be NFS mounted. Zypper can then access it as in a local directory.
继续阅读Installing k1om RPMs with zypper using an http repo for Intel Xeon Phi coprocessor
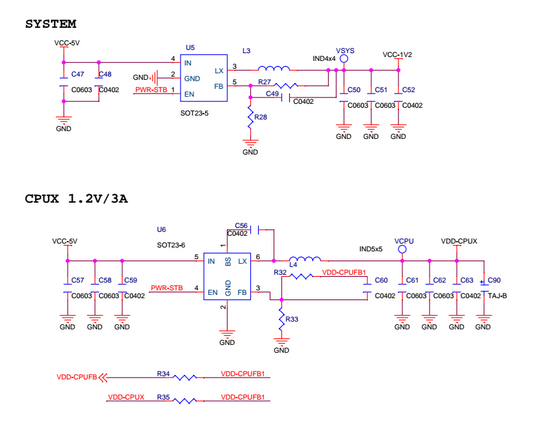
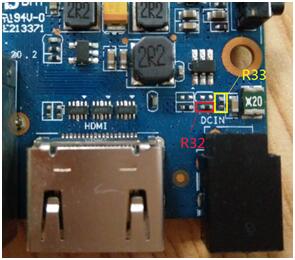
How to adjust the CPU voltage of BPI-M2+
This article introduced how to adjust the VCC-CPUX voltage of the BPI-M2+ with replacing a register of power circuit.
———————————
WARNING!
With any hardware change or component soldering.
You will LOST all warranty of your Banana Pi!
———————————
When I did something system image build and test tasks for the BPI-M2+ with Allwinner H3 before it on stock last year, I have received a Engineer Sample (ES) form SINOVOIP, the manufacturer of Banana Pi.
The Banana Pi Community Forum have received a lot of reports of the too high VCC-CPUX voltage causing horrible heat issue from other developers.
There is a easy to measure the VCC-CPUX voltage of your BPI-M2+.
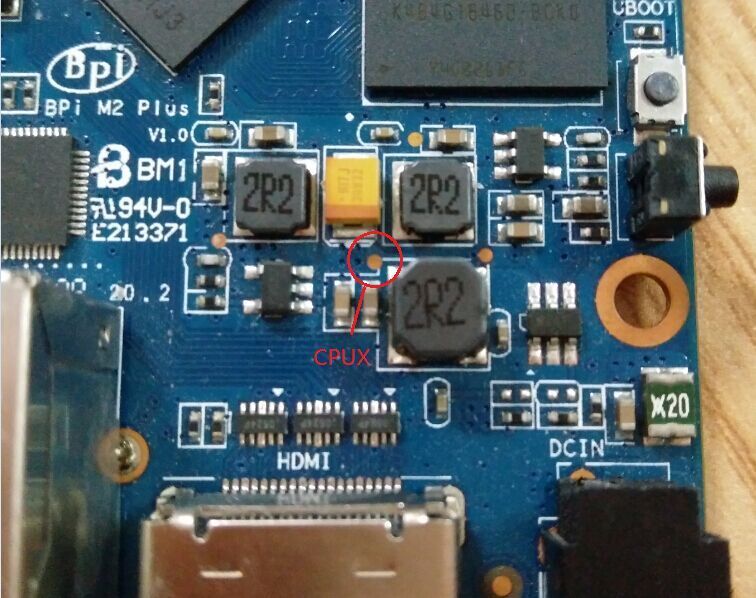
This picture shows the Test Point (TP: VCPU) of VCC-CPUX.
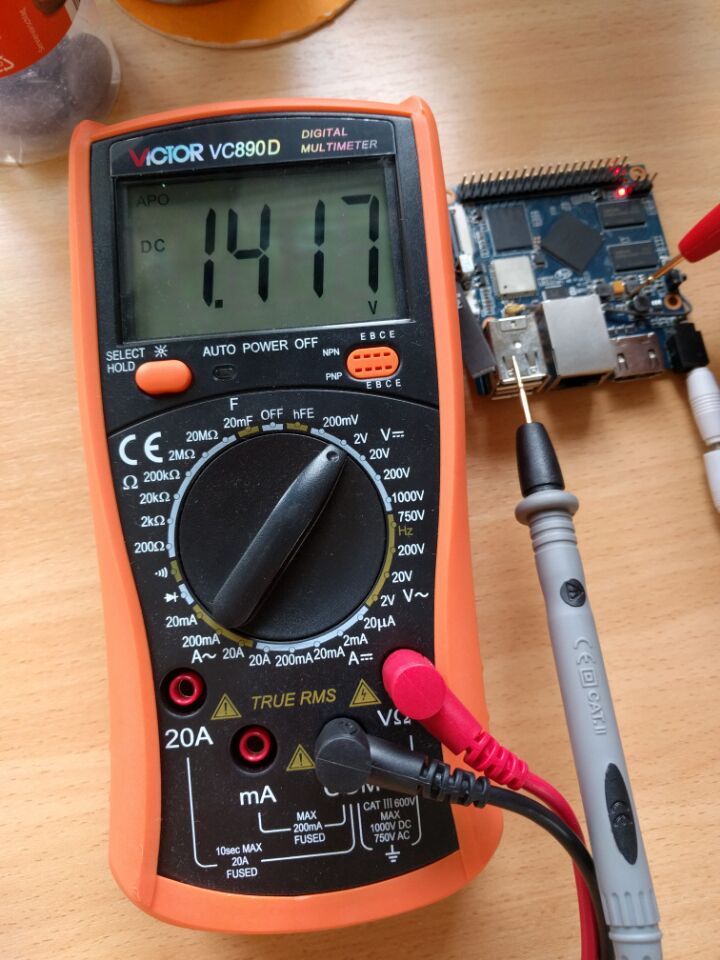
If you get a result like me, Congratulation! You got a ES. (R. I. P. the warranty
Okay, the next step is replace the reference register in the feedback circuit of the voltage regulator.
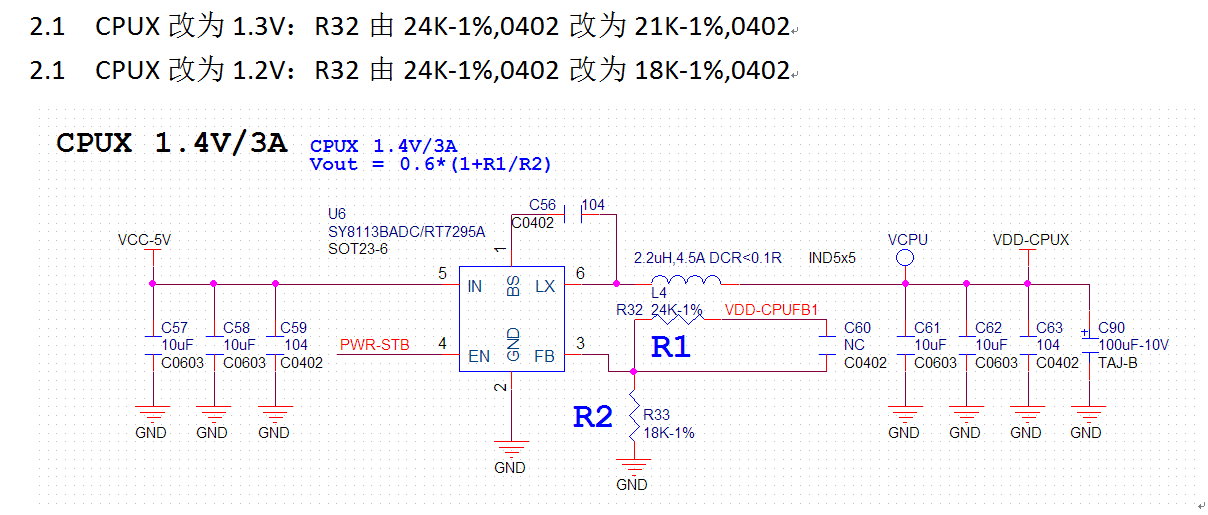
I have no 0402 register in my component library, so I use the 0805. (I’m sorry for that.
Before: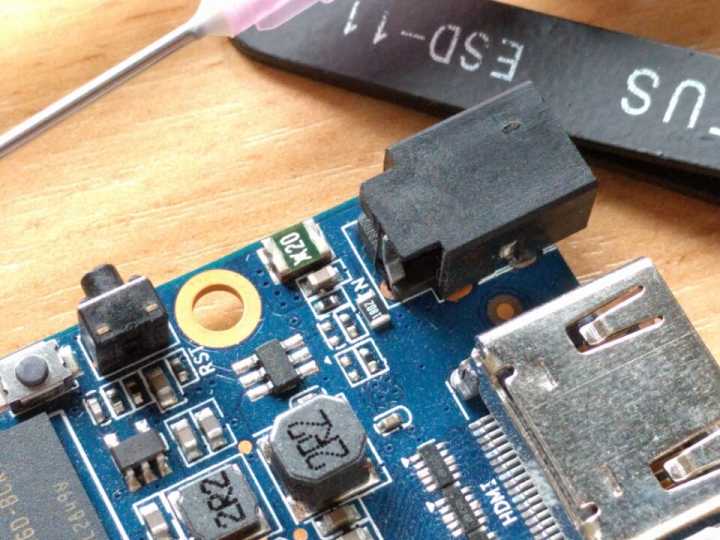
After: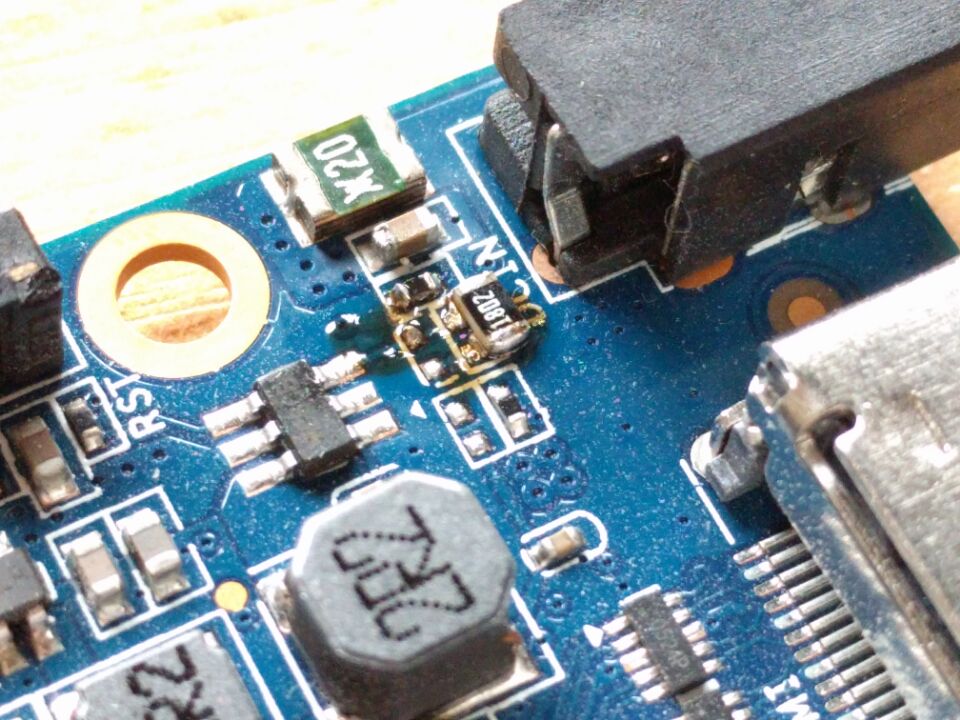
And it works. 🙂
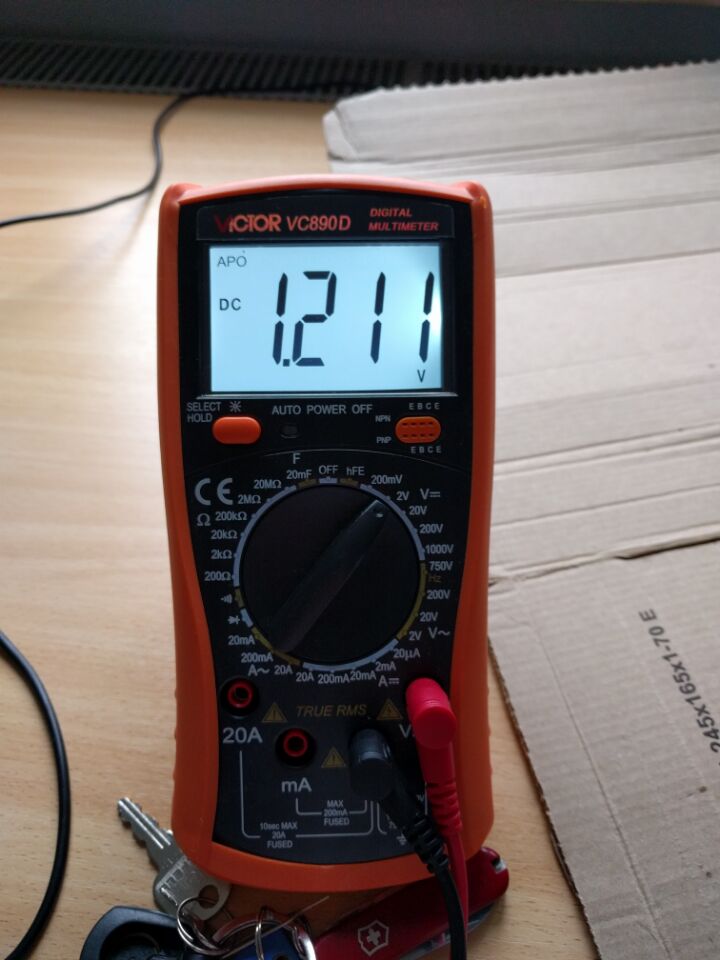
According to the AW’s whitepaper H3 should work at 1.008GHz max_freq, but I tested ok with the 1.2GHz sys_config. Lucky~
This is the cpuinfo_cur_freq result of running cpuburn-a7 (https://github.com/ssvb/cpuburn-arm/raw/master/cpuburn-a7.S) and corekeeper.sh.
The idle CPU temperature is about 15 degrees Celsius lower than work at 1.4 V.
For You – Rei Fu
『すべて 君のために』
またそんなこと言ってる
冗談のふりは楽ね? 私も知ってる
そういう自分に 酔ってる だけ
ほんとうは何もかも 自分のため
『世の中のために 何か役立ってる?』
独り言のように 問いかけてみる
人と出会うことがそのキッカケならば
あなたと ここから 始められる
ちょっとだけ この街の温度に 慣れてきた頃
I wanna cry for you
あなたと分け合う 恵みのしずくを
I wanna smile for you
自分のためじゃない愛の唄を 見つけたい
欲張りすぎちゃったな 欲しがってばかり
そんな 罪 悪 感を 紛らわすために
あの人みたいに いい顔 するなんて
素直にいいと 思えないのが不思議
イメージばかり作り込まれて 自然であればいいのに
I wanna cry for you
あなたと分け合えば 心も 晴れてく
I wanna dream for you
夢から覚めても忘れない唄を 見つけたい
All for you=All for me
いつでも あなたのために することは 自分のためになってる
人と出会うたびに その輪が広がってく
冗談は程々に 本音で語ったら
誰かのためになると 信じてる
そういうのが一番いいのかもしれない
I wanna live for you
あなたと分け合う 命のしずくを
Oh I wanna sing for you
夢から覚めても忘れない唄が聴こえる
I wanna cry for you
あなたと笑えたら 心も 晴れてく
I wanna dream for you
夢から覚めても忘れない歌が 聴こえる
I wanna cry for you
smile for you…
dream for you
